Tuesday, October 27, 2015

24 October 2015 - Project Update

Firstly, apologies for the lack of updates but hopefully from this point forward we can fix that.
So what's been happening on 549..?
Well its been a slow six months in regards to progress on S549, a few things have however been going on both on and off the locomotive, so let me update you of what these are.

Electrical System Upgrade - A fair bit of work has been carried out on improvements to the electrical system by Alex and John. The aim is to modernise the lighting to LED lights with the exception of the headlights which will be Halogen Lights. To give justice to what work has gone into this so far, I will ask Alex to provide a report of which can be printed in a later update. We look forward to Alex returning to the project once his work commitments ease up.

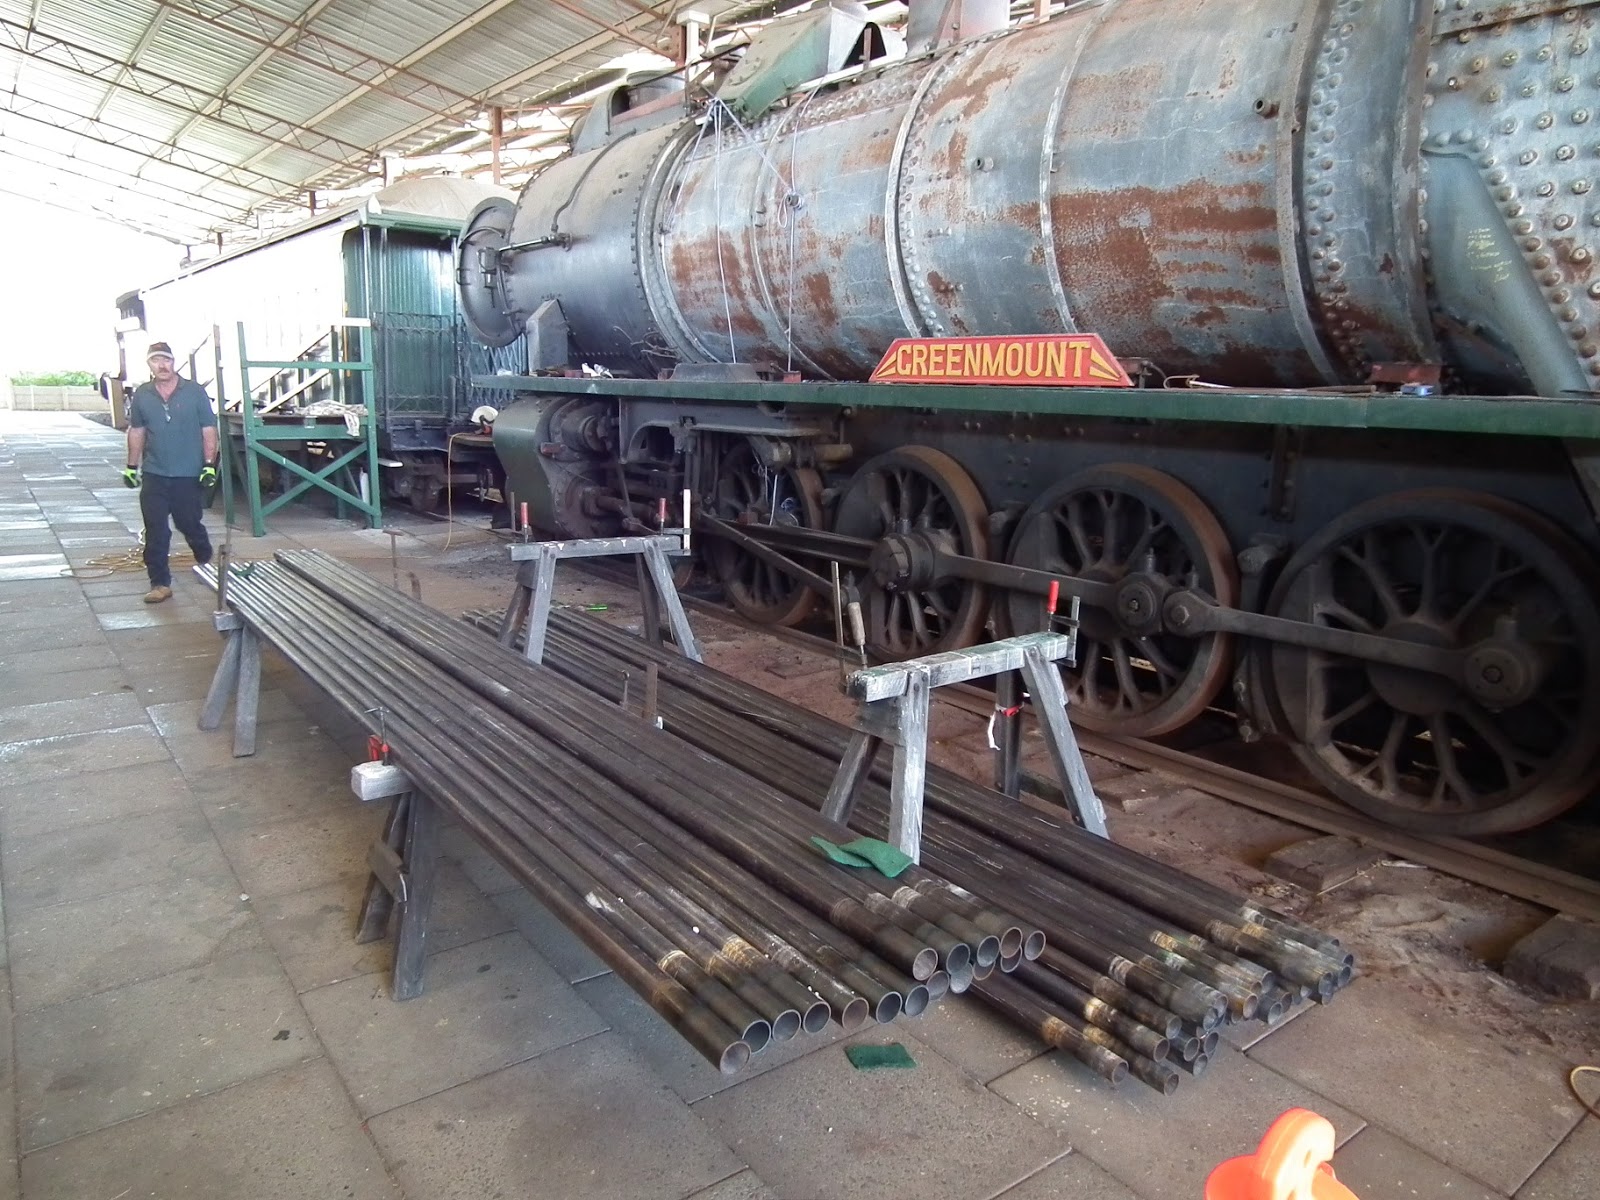
Tube Installation - All the small tubes are now in the boiler.....yes, but they are not fitted, they still require expanding, beading and welding. Placing the tubes in the boiler was the easier of the tasks.
The new tubes waiting for collection, one by one.
The Tube Installer....
Aligning the tubes into the firebox tube plate
All fitted - Smokebox End
All Fitted - Firebox End
Alex - The Troglobite
Tube Expanding Equipment  -  The S class has 2-1/4 inch outside diameter tubes which is unique to all other WAGR boilers, the common size is 1-3/4 inch outside diameter tubes with the exception of the P, U, W and V classes of which were fitted with 2 inch outside diameter tubes. All the old WAGR expanding equipment for the S class was disposed of shortly after steam finished although the 1-3/4 and 2 inch was retained.

So we needed to purchase new tooling to expand and bead the tubes, but where do you obtain such equipment..? As the need for boilers did not die at the time of steam locomotives as they are still required in other industries, this equipment is available from several manufacturers but not the same type as the WAGR had commonly used.

Back in the WAGR days, they used a tapered roller type expander but these are now as rare as hens teeth as newer more efficient types have made them redundant.
There is nothing wrong with this type of expander as they have been used on Hotham Valleys W classes and on the Rail Heritage's G class re-tubing projects since the end of steam with excellent results. However they expand the tube greater on the outside edge of the tube plate than the inner edge giving a lesser of a seal on the inner edge.

So once advised that we could not obtain the original taper type expanders, we were required to research other styles that would do the job, this was carried out with correspondence to the manufacturers of the expanders providing them with the new tube dimensions, the dimensions of both tube plates and the finished  required dimensions noting overhang at both the firebox and smokebox ends.

As the boilermaker had only used the WAGR style in the past, it was decided that two sets would be obtained, 1 set each from two well known suppliers, this would ensure that in the case that there were any breakages, problems with there performance or other, we would have a contingency plan. These were ordered in July and arrived in August.

Of the expanders we ordered, there were two different types; the smokebox expander was required to take into account the 3/4 of an inch protrusion of the tube from the tube plate and the fire box expander also flared the ends for preperation of the beading. We also ordered beading tools to bead the ends on the firebox end.

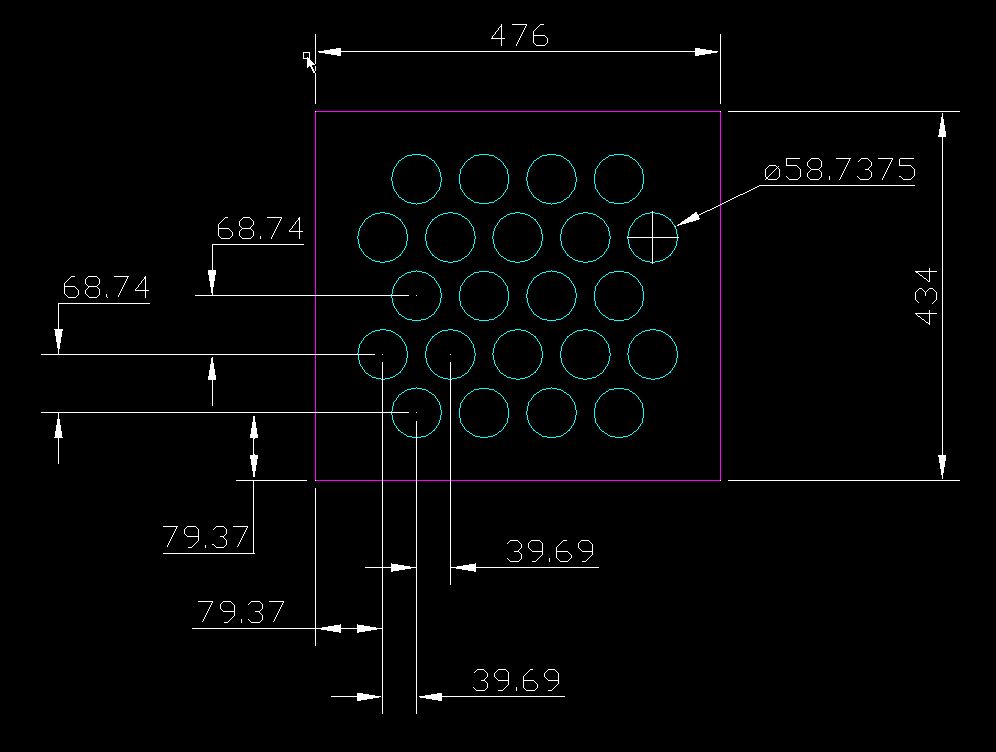
It was also decided to set up a 1:1 scale training module of a section of the boiler with the length of the tubes reduced to 500mm long. The tubeplate sections were drawn in CAD with the same hole dimensions and pitch between hole centers as per the original S class WAGR drawings, these were then supplied to a local machine shop for manufacture.


The module will assist with the following;
  • Training - As the boilermaker has the only experience in the installation of tubes into steam locomotive boilers amongst the S549 team, it gives the opportunity for the other members of the team to have a go as there is zero risk in mucking them up, just knock them out and have another go. Lets face it, none of us are getting any younger and if the skills can be passed onto others especially the younger members then that's a good thing. The younger members of Bennett Brook Railway have also shown interest in observing the procedure once we have it all set-up.
  • The expanded interference or fit-up of the tube to the tubeplate can be checked to ensure a sure seal is obtained. This is done by calculating the tube wall reduction and we would rather test it on the module than on the locomotive. I'll go into the wall reduction at a later time.
  • As mentioned before, the expanders are a different type to that previously used on small tubes, so we can get to know them and choose which model/make perform the best to give us the wanted outcome.
  • Gives the opportunity for the boiler inspector to review the processes and the fit-up of the tube to the tubeplate in what would normally be the water space which can be difficult to do on the locomotive boiler.
Saturdays objective was to set the module up ready for trialing tube installation at a later date, this was done in the morning with the assistance from John Cole. We had no intention of going any further than this as we are planning to use a drive motor with a torque setting to fit the tubes and we had not yet organised this. We then inserted a few pre-prepared tubes and decided, what the heck, lets manually expand one of them as per what was done many years ago in the running sheds because we can't stuff them up.
The Test Module
So we set the fire box end at 3/16 of an inch protruding, wedged the smokebox end to stop the tube from trying to rotate and with the use of an old WAGR tube expanding ratchet we started to rotate the mandrel and expand the tube. This was tricky as the expander wanted to flare the end prior to fully expanding the tube, we will need to practice a bit to get it just right but that proves the advantage of the training module.
Tube Prior to Expansion - (Firebox End on Module)
Tube Post Expansion & Flaring- (Firebox End on Module)
Tube Expander - (Firebox End on Module)

We then expanded the smokebox end and had no real issues other than it taking longer to expand the tube at this end for some reason...
Tube Prior to Expansion - (Smokebox End on Module)
Tube Post Expansion - (Smokebox End on Module)
Tube Expander & Ratchet - (Smokebox End on Module)
We only expanded one tube to get a feel of how things will go but next weekend we will do several more.

Well that's it for now, hopefully from this point forward work on her will increase rapidly.

Sunday, May 17, 2015

That Was Then - S549 - 1940's to 1971

Read about S549's time with the WAGR, she had a quite uneventful life but an interesting one all the same.

Click on the That Was Then - S549 - 1940's to 1971 page on the right or the link below, sit back and enjoy.

http://s549.blogspot.com.au/p/that-was-then.html

S class 549 Greenmount passing through Pinjarra,
Photo J. Joyce - Rail Heritage WA P06691 

Saturday, March 14, 2015

15 March 2015 - Project Update

So what's been happening since we have last spoke..? I'll try and fill in the gaps the best I can.
  • Boiler Inspection
    • Over this period an extensive boiler inspection was carried out on the vessel, some of the tests carried out are listed below;
      • Firebox side and crown stays were checked for any signs of fractures and if they were broken.
      • The water space area's were visually inspected, in the area's that could not be seen such as the water space between the inner and outer wrappers of the firebox, a borescope camera was used.  
      • Fluorescent penetrant inspection (FPI) was carried out in the firebox on the firebox inner wrapper, the throat plate and on the tube plate. FPI is a type of dye penetrant in which a fluorescent dye is applied to the surface of a non-porous material in order to detect defects that may compromise the integrity or quality of the part in question.
      • Numerous area's were thickness tested using ultrasonic testing equipment to see if any areas had been compromised by the reduction of thickness due to corrosion. Ultrasonic Thickness Measurement (UTM) is a method of performing non-destructive measurement (gauging) of the local thickness of a solid element (typically made of metal, if using ultrasound testing for industrial purposes) basing on the time taken by the ultrasound wave to return to the surface.
Yes, quite an extensive inspection was carried out, but it needed to be as in its current state stripped down (naked) externally and with the small tubes out, it was the best time to really check out her condition. Well the good news is we received the go ahead to proceed with the next stage, being the reinstallation of the tubes.


    Christmas and a bit of well earned time off - December and January
    Not only that but its bloody hot..!!!!!


        • Phase 2 - Reassembly - Now that the (visual) boiler inspection is complete, we have got to the point in which the disassembly stage is over and reassembly commences.


          In early February, one by one, the team got back together, the first job that was required was to measure the tubes so they could be cut to the correct length. There is an unwritten rule in the boilermaking trade and that is to "measure twice and cut once", well we stretched this a bit and measured about twenty times prior to the first cut. We did this a couple of ways, firstly we placed some tubes (about 8) into the boiler in various locations spread out from top to bottom, left to right and positioned them flush to the fire box tube plate, we then marked the tube where it protruded into the smokebox flush to the smoke box tube plate. We then removed the tubes and recorded the length to the markings. Secondly we measured the length of about the same quantity (about 8) of the tubes that had been removed from the boiler and recorded these measurements also. In the first instance, allowances had to be made for the additional material that was required to protrude past both tube plates", 1/4 of an inch for the firebox end and 3/4 of an inch for the smoke box end. The second instance only required the 1/4 of an inch for the firebox end. So after all this a cut length was verified and so the slow heavy task of cutting the tubes commenced. After the first day, 21/02/2015, around half of the 93 required tubes were cut to length. The remaining tubes were all cut the following Saturday.
          Tubes Cut To Length
          Following completion of cutting the tubes to length, the next task would be to anneal the ends of them.Wikipedia explains the Annealing process better than I could so this is what it had to say; Annealing in metallurgy and materials science, is a heat treatment that alters the physical and sometimes chemical properties of a material to increase its ductility and to make it more workable. It involves heating a material to above its glass transition temperature, maintaining a suitable temperature, and then cooling. Annealing can induce ductility, soften material, relieve internal stresses, refine the structure by making it homogeneous, and improve cold working properties.So the annealing process was carried out over the weekends of the 7th and 14th of February.To do this a small oven was assembled using the brick arch bricks from the S class as the walls and roof, a heating torch was then inserted from the top and hey presto a gas oven was made. Each tube was then heated up at both ends and then allowed to cool slowly. This was a slow labour intensive task, many a tired body was the end result from each of the days activities.
          S Class Brick Arch Oven
          Meanwhile back over at the S class, a temporary wooded floor was assembled where the grate was previously fitted. This will allow a safe platform to work off during the tube fitting process. Also a final washout to remove the remaining scale in the boiler prior to the new tubes being fitted.

          Thanks go to Greg, Alec, Josh, Kirk, Jaydan, Chad and Dom for their contributions to the above activities, without them there would be nothing to write about.

          Friday, October 24, 2014

          24 October, 2014 - Ten Years Ago Today

          Wow, how time flies, it only seemed like yesterday that S549 went back to Midland for the Midland Workshops Open Day celebrating the centenary of the opening of the facility.


          S549 entering the workshops yard
          S549 on public display

          Some great video footage taken by Brett Mohen below;

           S549 being moved out of the Bassendean Museum for display
           at the Midland Railway Workshops open day 2004.
          The loco was operated under Hotham Valley Railway's
           mainline accreditation with Gus Matherson at the controls.
          Brett Mohen
           
          It was great to see the Sammy out on the main line again however the Cartazzi axle bearing would play up on the way to Midland which raised a fair bit of concern bringing her back home to Bassendean. However she made it back with little drama. The bearing was later replaced prior to going to the Dowerin Centenary Celebrations.
           
          A DVD was made using footage taken of S549 being transferred to Midland Workshops and is called "How Steam Works". It is available from the Rail Heritage Bookshop at Bassendean or can be ordered online, follow the link below.

          Wednesday, October 22, 2014

          Vale Joe Moir

          The sad news of the passing of Joe Moir came through last Friday.

          Joe was a railway man through and through, he worked on the railways for the WAGR, he help restore old railway rolling stock and items for ARHS, he researched different railway subjects and in his spare time was involved in modelling of the WAGR, one would have thought he had trains in his veins.

          Joe - Fireman of S549 during its mainline trial to Muchea on 22 July 1997
          Photo Jeff.Austin taken at Muchea

          
          The WAGR S class locomotives were one of Joe's favourite engines and played a large part in her original restoration in the early 90's. His main contribution to the project was conducting engine trials up and down the siding at Bassendean to ensure all was in working order prior to being released for the mainline trial to Muchea. This happened over several weekends, up and down, up and down, check the bearings, up and down, up and down, check the bearings, over and over again. For Joe, he was in his element.

          
          Joe overseeing the first hydrostatic test on 549's boiler - March 1990
          Photo Phil Melling

          Not sure how he arranged it, but Joe ensured he was the fireman for 549's mainline trial to Muchea in July 1997, maybe he told the boss, its my engine and I'm on her, OK.?

          
          S549 "Greenmount", between Millendon and Muchea on trials after restoration
          Rail Heritage Photo P10003

          Joe at Dowerin - December 2006
          Joe at Dowerin making sure all is in order.
          Both Photo's Phil Melling
          Joe will be sadly missed when "Greenmount" hits the rails again hopefully next year, but somehow I believe he will be looking over to see she's behaving herself.

          Farewell Mate.
          RC

          Saturday, October 18, 2014

          Saturday, 18 October 2014 - Project Update

          Well again its been some time since the last report so as the saying goes "Better late than never"

          Whilst some of the team have been taking time off the project for a break, Greg, Josh and Jayden have been concentrating on removing the scale from the bottom of the boiler barrel and have done a fantastic job doing so. It has taken longer than expected due to the restrictions in the throat plate cavity previously explained but as you can see by the before and after photo's below there was a lot of debris to move. There is small amounts of scale remaining but this will be removed over the next couple of weeks.

          Great job guys.!!
          
          Before
          After

          We only have a couple of jobs remaining, remove the remaining scale in the boiler, remove the arch tube plugs and remove the centre supporting beam for the grate so the remainder of the foundation ring could be cleaned. However Saturday the 18th looked like it was going to be a day where all things would go wrong, a hire compressor that was needed to remove the arch tube plugs was not available, we hadn't organised a needle gun to continue with the cleaning of the boiler so it looked like a wasted day was ahead of us.

          With only the removal of the supporting beam for the grate on the list of tasks that looked like it could be completed, Alec gathered up jacks, sleepers and blocks required to lift it out of its supporting brackets so it could be moved to one side. It was thought that to lift this beam which would weigh approximately 250kg was going to be a huge task in itself as there is not a lot of room at the bottom of the ash pan to place equipment to lift it.

          Sleepers were placed through the ash pan doors to give the jacks an area to distribute the load and to minimise the risk of damaging the ash pan floor. A track lifting jack was then placed on top of these and fitted as close to centre of the beam possible and slowly raised until it came in contact with the beam. To our surprise it lifted easily out of the brackets of which it was then blocked up clear of these. The beam was then moved clear of the brackets and lowered so it rested on the ash pan skirt. The brackets were later removed so cleaning could continue.

          The centre supporting beam for the grate

          With that out of the way, what next..? We found an old needle gun which didn't work so why not try and fix it, we had nothing to loose..? Again as if it was our lucky day, with a couple of taps and words of encouragement from Greg, the tool fired up. Cleaning could recommence.

          The last of the hurdles was the removal of the arch tube plugs, what have we got to loose..? Lets keep persisting in their removal. These plugs are about 80-90mm in diameter and have about 50mm of thread in contact. The previous attempt in their removal was only successful in one of the four being completed with the other three refusing to even think about moving and without a bigger compressor forget about it..!!!

          Well as said before, it was our lucky day, with our small compressor working flat out all three were removed, the work area was full of smiling faces. Well done Greg and Kirk.
          Arrow points to the Arch Tube Plug
          Arch Tube Plugs Removed
          With the plug removed, the arch tube is revealed,
          to give some sort of scale of the plugs, the arch tube is approx. 60mm inside diameter.
          
          Greg holding the last of the stubborn plugs, look at that smile..!!
          After all the doom and gloom to start with, we had a very productive day. So what's next.? Mainly just cleaning prior to calling the boiler inspector to give it the once over.

          Well done team, your efforts are appreciated.

          Saturday, September 6, 2014

          Saturday 6 September 2014 - Project Update

          Well it's been some weeks since the last update, so this is well overdue.

          Removal of the Smokebox Concrete - 2 August 2014
          A section of the concrete in the smoke box was required to be removed so the section in which hidden could be inspected by the boiler inspector. The concrete is fitted to the floor of the smoke box so it is easier to clean the ash from the floor as the concrete covers the boiler to underframe mounting bolts and the lower section of the exhaust manifold. On an S class the concrete at its deepest section is approximately 6 inches thick, so to remove it a concrete saw was required to cut grooves into the concrete and then broken up with a jack hammer. This was hard, heavy and loud work which unfortunately restricted other activities on the locomotive for the day.
          
          The Removed Concrete

          Removal of the Grate - 9 August 2014
          The fire grate was required to be removed so the area of the boiler in which it covered could be inspected. Nothing seems to be light work on a locomotive of this size and this was no exception. The dump grate was removed the following Saturday. Well done team.
          
          The Removed Grate
           
          Where The Grate Used to Sit - Inside The Firebox


          Boiler Wash Out - 6 September 2014
          The long a tedious job of trying to clean the scale from the bottom of the boiler barrel has commenced. The scale, mainly tannin fell from the small tubes when they were removed and found a new unwanted home at the bottom of the barrel. We originally came up with several ideas to remove the scale but opted to use a high pressure hose and wash it towards the firebox and down the throat plate cavity and remove it through the foundation ring washout plug holes. On an S class the cavity of the throat plate is long and angular and it was found the scale would form a dam and would bank up which would require constant blasting to free up. It is though approximately half of the scale has been removed and the remaining should be removed next weekend.


          So the list now looks like this.
          • Removal of the firebox door. Completed
          • Finish removal of the welds on the firebox tube plate. Completed
          • Removal of the safety valves, crown mounting and clack valves so the mountings can be inspected. Completed.
          • Continue clearing the stay tell tale holes. Completed, well done Chad, Jaydan and Josh.
          • Removal of a section of the concrete in the smoke box so the front tube plate can be inspected. Completed
          • Removal of the grate so the foundation ring rivets can be inspected. Completed
          • Boiler washout to remove the scale left in the barrel as a result of the removal of the small tubes. In Progress.
          • Remove the scum cock so the boiler can be inspected.